I’m excited to be sharing today’s card and video. After promising a while ago that I would do a video dedicated to adding a sparkly sequin effect to images, I have only gone and done it! Wonders will never cease, ‘ey? I even added an audio commentary for you. You will find the video towards the end of this post. Today’s video focuses on the sparkle technique, if you’re hoping to see a no line colouring video, I will be working on one soon!
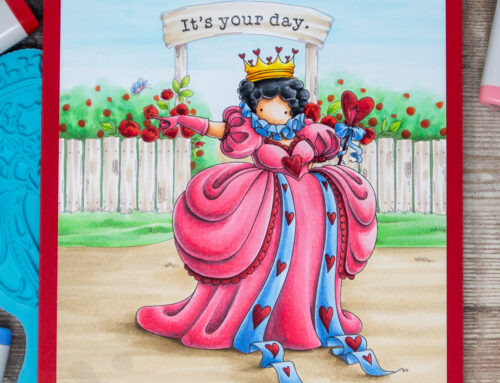
Oddball Queen of Hearts Card
This technique can be used to add a sparkly sequin effect to any image, but ones with fabulous big dresses are perfect.

Stamp Used: Oddball Queen of Hearts
Other supplies: Make it Colour Blending Card, InkOn3 Fadeout Ink, Copic markers, Polychromos pencils*, atyou Spica Glitter Pens*, Sakura Classic White Gelly Roll pen*
I stamped the image using InkOn3 Fadeout Ink on my favourite Make it Colour Blending Card before colouring with Copic Markers using the no line colouring technique. I also used some Polychromos pencils to enhance the shadows. Finally I added the sparkly effect using atyou Spica glitter pens and a white gel pen.

NOTE: The Spica glitter pens are a bit more expensive on Amazon currently than when I purchased them. I paid around £20 per set a few years ago. If this is outside of your budget, absolutely try it with what you have available. I will be playing with some cheaper options soon to see what other pens I can recommend. Sakura Stardust Gelly Roll pens* are an option I have used for years in other ways and recommend generally. The colour range is a little more limited in comparison to the Spica pens, and I would say that the Spica pens do last longer.
If you are in the UK/Europe you can find Stamping Bella stamps and dies at Dies to Die For here in the UK.
Create a Sparkly Sequin Effect Video
Watch me add a sparkly sequin effect to Oddball Queen of Hearts in the video below. If you enjoy watching please do like the video and subscribe over on my YouTube channel.
As I mention in the video, I was originally inspired to try this method of adding sparkle by maxxstephen on Instagram, who creates gorgeous Disney fan-art pieces, with amazing sparkle. Please do go and check him out, his work is beautiful and inspiring.
Thanks for stopping by!
I hope you have enjoyed today’s post as much as I enjoyed creating it for you.
Don’t want to miss out on future posts? Subscribe to my RSS feed in your favourite blog reader or subscribe to my email newsletter.
Follow me over on Instagram where I share frequent peeks at the colouring I’m doing along with other day to day snaps. You can also follow my page on Facebook if you’d like to connect over there. Subscribe to my channel on YouTube (and hit the notification bell over there to make sure you don’t miss out on updates).
Help support this blog and my work directly – become a patron over on Patreon.
Any and all support you give, whether it simply be liking a video or social media post, commenting here on blog posts, purchasing via affiliate links or giving direct support through Patreon, is greatly appreciated.
Please note that in order to assist with the running of this blog I do use affiliate links from time to time and there may be some in this post, denoted with a *. Please see my About Me page for more information.
In my capacity as colourist and design team member for Stamping Bella, I do receive the stamps I use from them. All opinions and creative decisions remain my own, and I only work with companies/use products that I love.


This is just amazing! I love to watch you work!
Thank you!
Beautiful!